 My love of making things often leads to me having a ridiculous amount of… things. Blankets, jumpers, jewellery… I tend to make things and then not really know what to do with them. Because of this, I often try to make most of my Christmas presents to people. This way I have a specific reason to make things, these made things don’t overload my (already overloaded) room, and, let’s be honest, it saves me money. This year was no different, and I spent the weeks before Christmas making framed doilies and jars of homemade spice mixes.
“But where are the candles?! It’s a post about candlemaking, it says so in the title!” Indeed it does. My foray into candlemaking didn’t actually start with any sort of candlemaking plan. It sort of came about as the result of a happy accident.
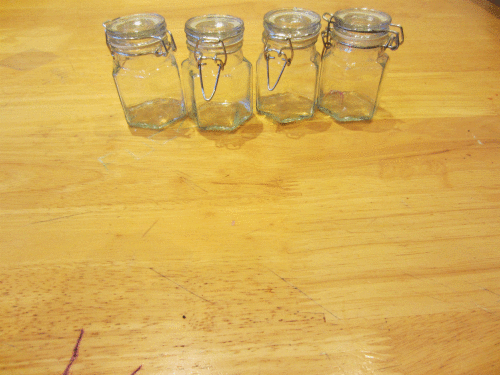
As I mentioned, I made jars of homemade spice mix as Christmas presents this year. For these I ordered some glass jars online, but when they came they were smaller than I realised. Thankfully I was able to buy some larger ones from a hardware shop nearby, but I was left with a pack of sad spice jars, disappointed to not be used. I took them home to London hoping that inspiration would hit.
Then, inspiration hit! While rummaging around in my cupboard, I found a large supply of tealights that I hadn’t used. My brain-hamster started the wheels going, and I decided to combine them with my small mason jars to make cute little candles in cute little holders. I gathered the supplies I’d need and, with the help of some wonderful tutorials by Ruth at ‘living well spending less’ and Jen at somethingturquoise, began to make.
Fortunately I had most of what I needed, only having to buy some candle wicks. What I didn’t have was a container with a spout or a food thermometer, but I figured I could do without.
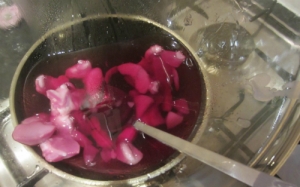
First I had to crush up the tealights to make them easier to melt and so I could remove the small wicks already in them. I did this with a freezer bag and a rolling pin – much fun! Eddie cat was more than a little unhappy about the sudden loud noises, but he soon saw something shiny and forgot.
 Melting my crushed wax was great fun – it just looks so pretty. I used a glass bowl on top of a pan of boiling water and this worked like a charm. The tealights didn’t give me as much melted wax as I thought they would, but I still had enough for all of the jars. I think I’ll buy some wax pellets in bulk if I make more (which I will) and use essential oils to scent them. After melting the wax I realised why it would have been a good idea to use a container with a spout instead of the glass bowl, but without a spouted container my options were limited. I decided instead to scoop the wax from the bowl with a measuring cup and then pour it into the glass jars from that. I poured in a small amount first to secure the metal disc at the base of the candle wick in order to keep it as centred as possible, then poured in enough wax to fill each jar. I’d be lying if I said that this went perfectly without creating any mess whatsoever… I think I’ll probably still be finding splashes of wax on the floor (and worktop and cupboards and cutlery…) for a while.
 While this dried and hardened I cleaned up, which was trickier than the tutorials would have you believe. I tried using kitchen towel to wipe the wax away from the bowl while it was still warm, and this just sort of… spread it. I ended up boiling the kettle, putting the bowl, measuring cup and any utensils that were waxy in the sink and pouring the boiling water over them. I then waited for it to be cool enough to put my hands in but hot enough to keep the wax melted so I could wipe the wax away into the water. I’m sure there is an easier way to do this (perhaps not using the glass mixing bowl and finding a spout would be a good beginning), but it worked for the time being.
Once the wax in the jars had hardened I got my decoupage paper out and started decorating. I did all four jars in the same way this time, but for when I make more I’d like to try using PVA glue mixed with food colouring to create a coloured wash over the glass and maybe adding some glitter (there is never a reason not to have glitter).
 As I don’t have a food thermometer I hadn’t waited for the wax to reach a certain temperature before I poured, so as it cooled in the jars it sort of bowed in the middle, so the wax doesn’t look as neat as I would like. It’s not a huge problem though – as soon as the candle is lit and the wax begins to melt it all evens out. For an accidental adventure I am pretty happy with how they turned out, and am already planning an expedition to some charity shops to see what other containers I can find to use!
I’d love to hear what you think of them, and if you have any questions or suggestions, so please pop a comment in!


Gorgeous candles, I’d be happy to have one of those on my mantle and I normally stick to yankees. You can get 20% perfume oils which supposedly give off as much scent when burnt as candles as Jo Malone et al. Also maybe a pyrex jug would be best for melting the wax? You could do 30 second bursts in the microwave with that and I believe Wilkos have a half price sale on pyrex right now!
Candle making is actually something I’ve always wanted to try since I spend a fortune on them already but I’m not sure my OCD could deal with the mess to be honest! Still I’ve been inspired by how simple you’ve made it sound and I’m bound to end up trying it myself soon once I’ve used up my stash of post-christmas sale candles.
LikeLiked by 1 person
A pyrex jug! I think I’ll be investing in one of those! It was surprisingly simple, let me know if you give it a go!
LikeLike
These look amazing, the jars are really pretty! Jasmine scented ones for my birthday maybe?!! 🙂
LikeLiked by 1 person